One of the goals we attempt to achieve in the work we do here at Blazer Six is to make sure our solutions are easy to use. It’s not just about getting the job done and launching a website that looks good to visitors — it’s also about giving clients the ability to publish and manage their content. Poorly implemented features will lead to more support requests, frustration — which doesn’t reflect well on us or WordPress — and at worst, it could waste valuable time and money. Quite simply, we’ve found that if it’s not easy, then the feature most likely won’t be used.
Managing media outside of the built-in workflows has always been a particular pain point and our solutions over the years have evolved to help address some of the shortcomings, but to an extent, they always felt less than ideal. Usually, they involved leveraging the Thickbox media popup, adding data attributes to media elements, and polling the iframe to attach events and update text that couldn’t be filtered when necessary. They could be far from elegant from an implementation perspective, but they made working with media easier from a management standpoint.
So when I found out that the media workflows and functionality would be tackled in the latest version of WordPress, I was pretty excited, and the initial wireframes didn’t disappoint. I was also hesitant because we had already built quite a few tools for working with the existing setup and didn’t have a clue how backwards compatibility would be maintained.
A few weeks before the scheduled release, I took a nightly build for a test drive and dug into the code to see how much of our existing tools were salvageable and how the default workflows could be extended.
Big mistake! But ultimately, a fruitful learning experience.
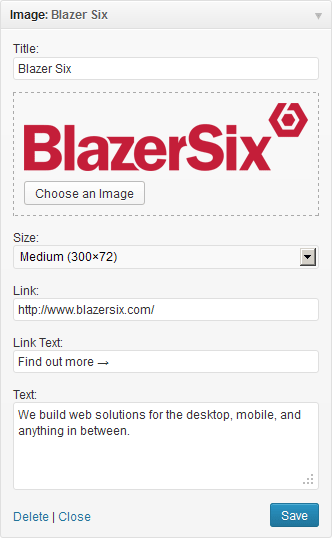 I decided to build a better image widget — something seemingly simple that’s not too different from the featured image workflow and could be used as a starting point. I was fairly satisfied with my initial effort, but the code in the post thumbnail meta box didn’t resemble an API and it was eventually reverted to maintain compatibility.
Eventually things stabilized enough that I was able to wrap my mind around how the media manager functioned and was finally able to make something that has worked fairly well since the release of WordPress 3.5, but it would have been rather comical to anyone watching me try to keep up during development.
Building the Widget
Based on experience with prior image widgets, I had an idea what I wanted from this one and my main goals were to:
- Create something dead simple from a user’s perspective.
- Be flexible enough to work for a wide range of applications.
- Have the ability to reuse the code in a couple of different ways:
- A media selection control for use in settings fields, meta fields, user profile images, etc.
- Easily filter the widget to modify the way it displays content.
When working with media, I prefer to store attachment IDs rather than URLs due to the extra flexibility it provides, so performance was also a consideration if each page was going to potentially be fetching multiple attachments outside of the loop.
In addition, I typically bundle widgets with the theme for client projects, but to make this more broadly useful, I decided to build it out as a plugin and ended up with three basic files that we’ll briefly cover: The plugin and helper methods, the widget class, and the JavaScript to interact with the media frame.
The Image Widget Class
For my needs, an image widget isn’t just about displaying a photo on the front end of a website in a sidebar; it should be useful for all sorts of different purposes (carousels & sliders, video thumbnails, featured posts, etc). Being able to make the widget adapt to various scenarios is key to allowing us to quickly build out simple and flexible solutions.
Even after creating a fairly standard widget and adding a few filters to allow for customization, it still felt cumbersome to have to attach multiple filters for any real modification; adapting the widget based on the sidebar it was displaying in was a bigger pain; furthermore, showing a few extra fields for links and text just didn’t feel right in some scenarios.
Allowing the widget to be extended proved to be the solution here. To do this, the custom widget constructor needs to have the same footprint as the WP_Widget class so that all the properties can be customized and passed through to the base class.
| <?php | |
| class WP_Widget { | |
| function __construct( $id_base = false, $name, $widget_options = array(), $control_options = array() ) { | |
| // … | |
| } | |
| } |
Next, the standard widget() method for displaying a widget can include a filter for modifying the content, but like I mentioned, that can be cumbersome and when allowing the main widget to be extended, it’s confusing to consider which widgets you actually want the filter to apply to. Simply overriding the main widget() method means a lot of work needs to be duplicated to accommodate the caching, filtering, and sanitization that usually occurs at the same time. To get around that, we’ll break the output into a separate method called render() that accepts the sanitized and filtered data, then generates the content and passes it back to the widget() method to finish caching.
Maybe you see where I’m going with this and some of you have probably even done it yourselves (and might have a better solution; please share!).
| <?php | |
| /** | |
| * Abbreviated image widget class. | |
| */ | |
| class Blazer_Six_Widget_Image extends WP_Widget { | |
| /** | |
| * Setup widget options. | |
| * | |
| * Allows child classes to override the defaults. | |
| * | |
| * @see WP_Widget::construct() | |
| */ | |
| function __construct( $id_base = false, $name = false, $widget_options = array(), $control_options = array() ) { | |
| $id_base = ( $id_base ) ? $id_base : ‘blazersix-widget-image’; | |
| $name = ( $name ) ? $name : __( ‘Image’, ‘blazersix-widget-image-i18n’ ); | |
| $widget_options = wp_parse_args( $widget_options, array( | |
| ‘classname’ => ‘widget_image’, | |
| ‘description’ => __( ‘An image from the media library’, ‘blazersix-widget-image-i18n’ ) | |
| ) ); | |
| $control_options = wp_parse_args( $control_options, array( ‘width’ => 300 ) ); | |
| parent::__construct( $id_base, $name, $widget_options, $control_options ); | |
| } | |
| /** | |
| * Default widget front end display method. | |
| */ | |
| function widget( $args, $instance ) { | |
| // Return cached widget if it exists. | |
| // Filter and sanitize instance data | |
| $content = $this->render( $args, $instance ); | |
| // Cache the generated content. | |
| } | |
| /** | |
| * Generate the widget output. | |
| */ | |
| function render( $args, $instance ) { | |
| // Generate content. | |
| return $content; | |
| } | |
| } |
So now that I have a functioning image widget, if I want to create a widget for a more specific purpose, say for a slider, all I need to do is create the class, define the standard widget properties in the constructor and override the render method to generate the custom output. Clients can now drag a “Slide” widget to the Slider widget area instead of having to add a generic image widget.
| <?php | |
| /** | |
| * Abbreviated slide widget class extending image widget. | |
| */ | |
| class Slide_Widget extends Blazer_Six_Widget_Image { | |
| /** | |
| * Setup widget options. | |
| */ | |
| function __construct() { | |
| $widget_options = wp_parse_args( $widget_options, array( | |
| ‘classname’ => ‘widget_slide’, | |
| ‘description’ => ‘Add a slide to the homepage slider’ | |
| ) ); | |
| parent::__construct( ‘slide’, ‘Slide’, $widget_options ); | |
| } | |
| /** | |
| * Generate the widget output. | |
| */ | |
| function render( $args, $instance ) { | |
| // Generate content. | |
| return $content; | |
| } | |
| } |
That’s pretty much it. I don’t need any of the standard methods since I only want to override the output, however, similar overrides can be built out for the standard form and update methods for even more control.
The Image Control
So now that we’ve addressed how I was able to reuse the widget itself by extending it, I want to cover the image field in the widget form. There are quite a few viable approaches, but for now I’ll discuss this within the context of the widget, while keeping future applications in mind.
As I mentioned, I like to work with attachment IDs instead of URLs due to the extra flexibility. This means that the selected image ID needs to be stored with the widget settings, but we don’t want to show this field to the user because it would be meaningless to them. All we want them to see is the image they’ve selected and give them the ability to change it. Beyond that, they don’t need to be concerned with the URL or the attachment ID.
Thinking about it a little more, this particular pattern could be used in multiple locations throughout the dashboard for any type of media, so I resorted to simply calling it a media control.
The media control can have various properties associated with it, including the button to launch the frame, the type of media to select, the number of items to select, and the frame title and frame button text, to name a few. These could all be declared in the JavaScript, but it’s much easier to simply add them directly to the media control via data attributes (especially localized text) and let the JavaScript handle it from there. What we wind up with is something that looks similar to this:
| <p class=”blazersix-media-control” | |
| data-title=”Choose an Image for the Widget” | |
| data-update-text=”Update Image” | |
| data-target=”.image-id” | |
| data-select-multiple=”false”> | |
| <?php echo wp_get_attachment_image( $image_id, ‘medium’, false ); ?> | |
| <input type=”hidden” name=”image_id” id=”image_id” value=”<?php echo $image_id; ?>” class=”image-id blazersix-media-control-target”> | |
| <a href=”#” class=”button blazersix-media-control-choose”>Choose an Image</a> | |
| </p> |
Now if I want to, I should be able to simply copy that HTML (or create a helper function) anywhere in the dashboard, include the JavaScript, and have a simple, familiar media selection control.
Working with the Media Manager

There’s simply too much to cover and I don’t consider myself enough of a JavaScript expert to say exactly how things should be done, so I’ll go over a few things about my experience working with the new media manager to provide a little direction for anyone wanting to dive in.
A fair bit of what you would probably want to do has already been accounted for and just requires reading and understanding the existing code — there’s a ton of useful stuff and I’m sure it will eventually get exposed by more capable developers. Look to some of the places where the media manager is being used in the dashboard already, like the Custom Header and Background screens, and of course, dig through the new media files in /wp-includes. I’d highly recommend watching this series by Jeffrey Way to help grasp Backbone.js.
When you start writing your code, document it well. Leave references to functionality you’re mimicking and links to resources or guides you’re following. This is stuff you should do anyways, but you will eventually forget details and it helps to have a few breadcrumbs to jog your memory.
With that out of the way, this is the basic structure of my object for handling image uploads and selection, which adheres somewhat to the functionality for selecting a featured image:
| jQuery(function($) { | |
| mediaControl = { | |
| // Initializes a new media manager or returns an existing frame. | |
| // @see wp.media.featuredImage.frame() | |
| frame: function() { | |
| if ( this._frame ) | |
| return this._frame; | |
| this._frame = wp.media({ | |
| title: ‘Frame Title’, | |
| library: { | |
| type: ‘image’ | |
| }, | |
| button: { | |
| text: ‘Button Text’ | |
| }, | |
| multiple: false | |
| }); | |
| this._frame.on( ‘open’, this.updateFrame ).state(‘library’).on( ‘select’, this.select ); | |
| return this._frame; | |
| }, | |
| select: function() { | |
| // Do something when the “update” button is clicked after a selection is made. | |
| }, | |
| updateFrame: function() { | |
| // Do something when the media frame is opened. | |
| }, | |
| init: function() { | |
| $(‘#wpbody’).on(‘click’, ‘.blazersix-media-control-choose’, function(e) { | |
| e.preventDefault(); | |
| mediaControl.frame().open(); | |
| }); | |
| } | |
| }; | |
| mediaControl.init(); | |
| }); |
Of course, the logic still needs to be added to that snippet, but for the amount of functionality you get, that’s ridiculously little code.
The complete widget and code is available on GitHub for anyone interested in poking around. I haven’t decided whether it’s worth releasing another image widget into the official plugin directory and figured I’d try to get a few more eyes on it in any case. Shortly after writing this post, I took over development of an outdated image widget and updated it to work with the new media manager. Simple Image Widget can be found in the plugin directory or the code is on GitHub.
Props and Resources
While there are still a few rough edges to sand down and use cases that can be easier to incorporate with the new media manager, it’s a remarkable improvement and should open up all sorts of possibilities for plugins. I haven’t seen many using it yet, but that’s bound to change soon.
- Jonathan Christopher integrated it into his Attachments plugin if you want to study his code (I hear he’s looking for reviews, too).
- Mike Jolley recently published a post that covers some of the same territory I did.
- Thanks to Ryan Imel for the mention on the WP Late Night podcast. Like most things I do, I sent out a couple tweets and got little feedback (no one ever accused me of being good at marketing), so that was pretty cool.
And finally, major props to the core team for rolling out a huge feature in a such a short window and getting it released on time.
Leave a Reply